Full Stack Data Dev.
Introduction
The first article in this series was the default WeatherForecast model that is created by default in a .NET Web API project. We'll build off Article 1 to start reading in values from environment variables and appsettings.json files.
The code for this article can be found in the following GitHub Repo - Article 2. The repository will contain a dedicated directory for each article in the series.
Environment Variables
Environment variables are used for specifying external configurations or settings such as credentials, secrets, service configs, and any important stuff we need to remember. Not just are they important but they can change from time to time, so they need to be in a location for quick access to change and be available for any resource or application to pick up these changes.
First, let's review how we set environment variables on macOS or similar *nix environments. Read my short article on creating Environment Variables as a refresher.
Now let's review how to read those environment variables in a .NET Web API project.
Read Runtime Environment in .NET
One of the primary reasons to read an environment variable is to identify the correct environment your application/ service is running in. Visual Studio, on both PC and Mac, has a built-in Environment Variable Configuration feature built into the IDE.
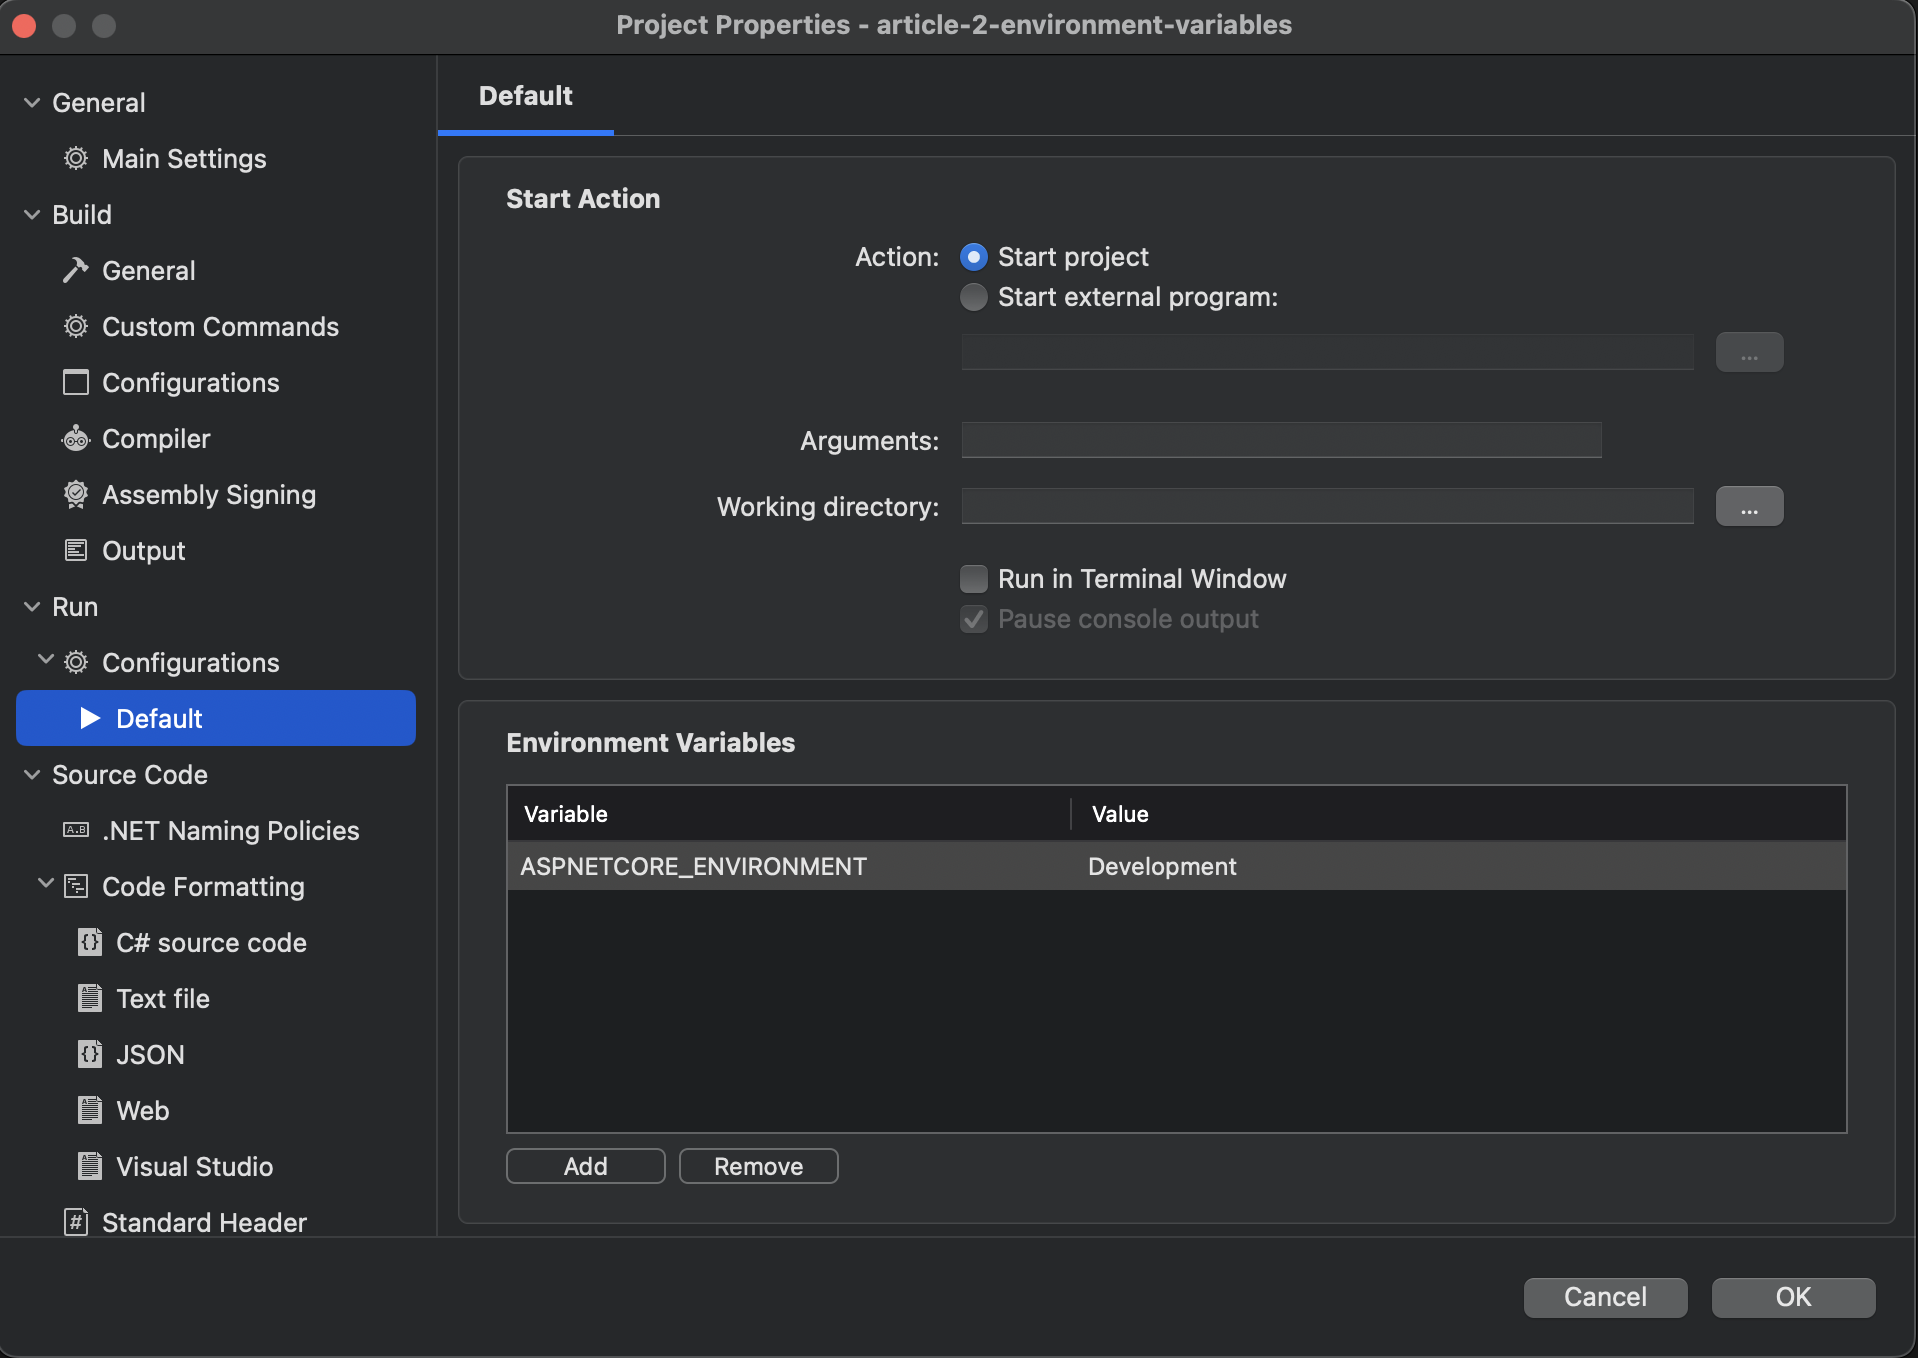
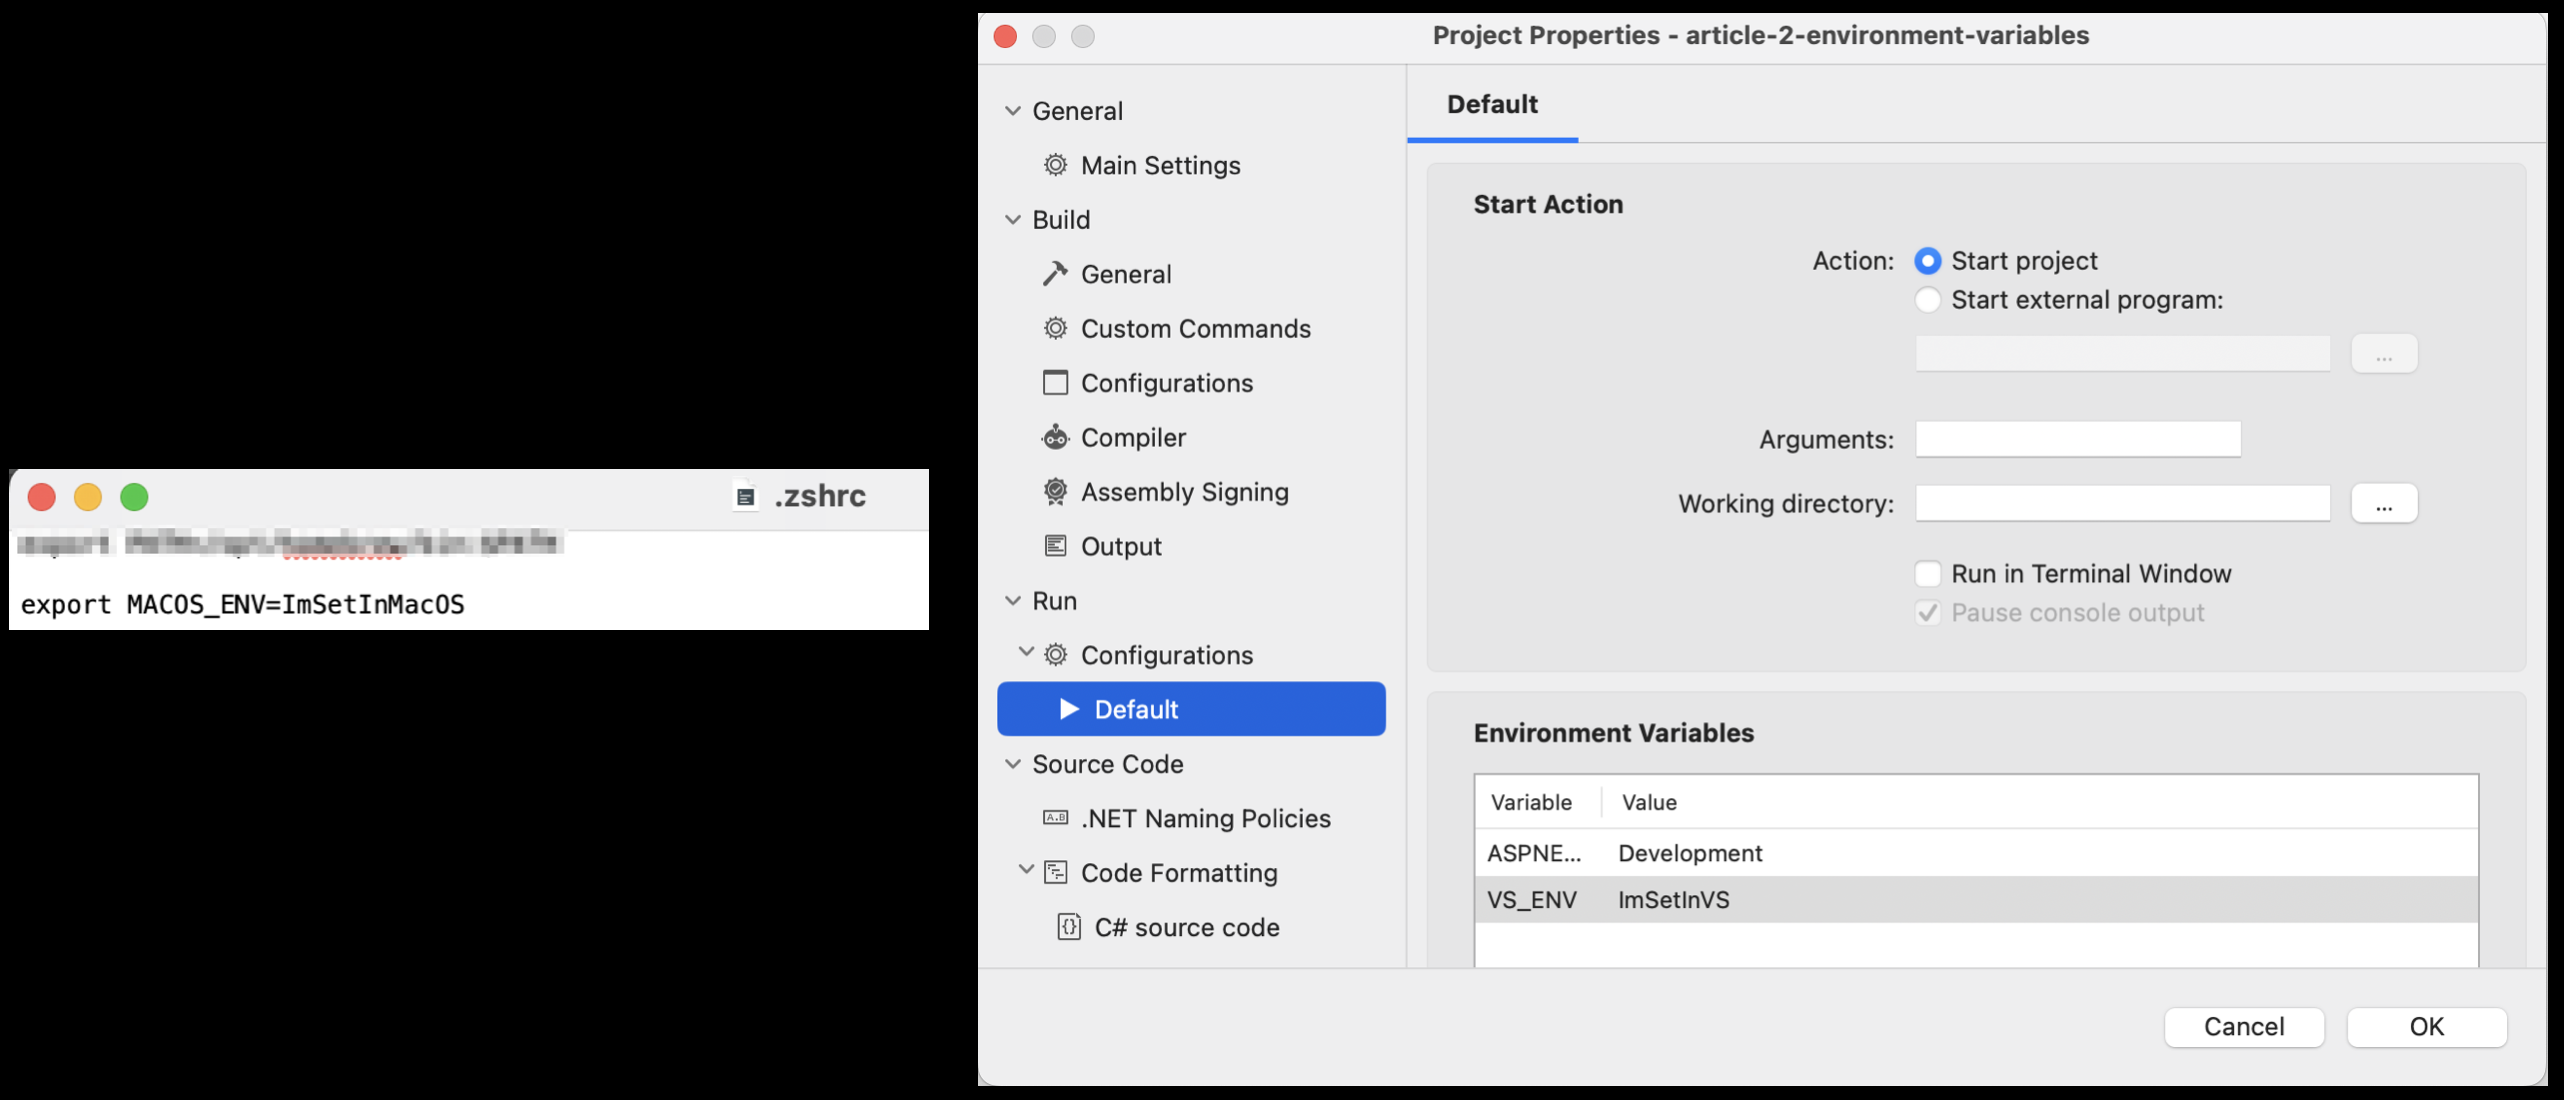
We can set any value we'd like to use in our application by using the .NET Web API project's properties. Right-click the main project in the Visual Studio Solution Explorer and select Properties. In the Properties window, Go to the Run > Configurations > Default section. You'll see the Environment Variables table.
The example project we built in Article-1 is setting the ASPNETCORE_ENVIRONMENT variable to the value Development. The ASPNETCORE_ENVIRONMENT is a reserved word for .NET to automatically assign it to the application's Hosting Environment. You can read further detail about .NET Runtime Environments here.
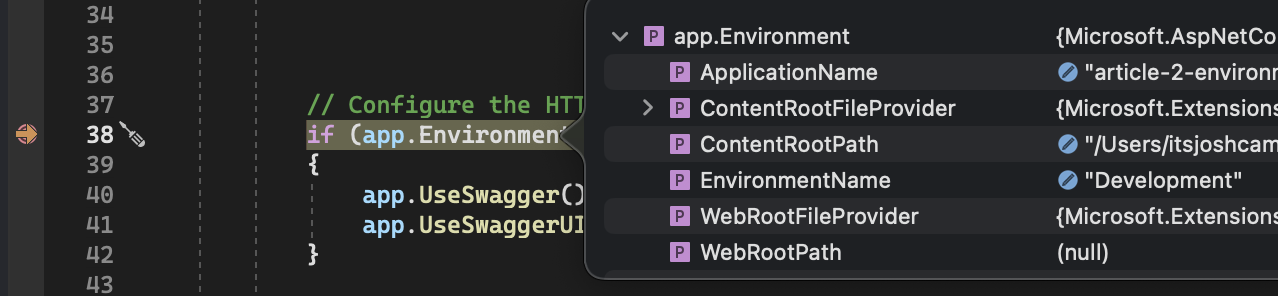
Back to the code: the Program.cs file is using the ASPNETCORE_ENVIRONMENT variable to determine if the environment is set to Development. The if statement on line 38 will determine if the Swagger (OpenAPI) Documentation should be displayed. In the screenshot below I'm running the project and set a breakpoint on line 19. I'm hovering over the app.Environment variable. As you can see .NET read in the value and the EnvironmentName is set to Development.
Read Environment Variables in .NET
Now let's review custom environment variables, I'm going to create a new env variable VS_ENV in the Visual Studio properties window and one env variable MACOS_ENV in macOS (.zshrc file). If you are using bash, it would be created in your .bashrc file. Below are screenshots of the newly created env variables.
⚠️ WARNING! ⚠️
Visual Studio won't read in your MACOS (export env variables) by default. In order to have Visual Studio read in OS env variables you need to start Visual Studio from your terminal. You can't double click the icon. Shut down your current instance of Visual Studio and start the application from your terminal.
To start Visual Studio from your terminal use the following command in your terminal:
open -n "/Applications/Visual Studio.app"
Now back to work, add the following code to your Program.cs file to read our new env variables values.
// Taken from Program.cs
...

var app = builder.Build();

var vs_env = Environment.GetEnvironmentVariable("VS_ENV"));
var macos_env = Environment.GetEnvironmentVariable("MAC_ENV"));

var dict = Environment.GetEnvironmentVariables();
//Add Breakpoint on next line
foreach(var d in dict)
{
    Console.WriteLine(d);
}

...
Add a breakpoint stopping on the foreach statement and run the project. On start-up, hover over the dict variable and you'll see all environment variables that are read in from Visual Studio. You can hover over the vs_env and macos_env variables and see the values we created. Cool, we can read env variables now.
Starting Visual Studio on your Mac from the terminal is not something you want to do each time you start the app. For that reason, I stick to using environment variables from either the project's properties windows we used earlier or I use the project's appsettings.json files. These files can be set to use a runtime environment automatically. Based on the ASPNETCORE_ENVIRONMENT variable, .NET will load the matching appsettings.json file. Let's test it.
Read appsettings.json Variables in .NET
In .NET 6, the WebApplicationBuilder class exposes the Configuration properties to the application. The Configuration class makes it easy to read values from the appsettings.{RuntimeEnvironment}.json files.
Let's create a new file at the application root of the project named: appsettings.staging.json. Visual Studio will automatically nest app settings environment files under the main appsettings.json file.

The app setting files should have the following content:
// appsettings.Development.json
{
  "Logging": {
    "LogLevel": {
      "Default": "Information",
      "Microsoft.AspNetCore": "Warning"
    }
  },
  "MyENV": "ImFromDevelopment"
}


// appsettings.Staging.json
{
  "Logging": {
    "LogLevel": {
      "Default": "Information",
      "Microsoft.AspNetCore": "Warning"
    }
  },
  "MyENV": "ImFromStaging"
}
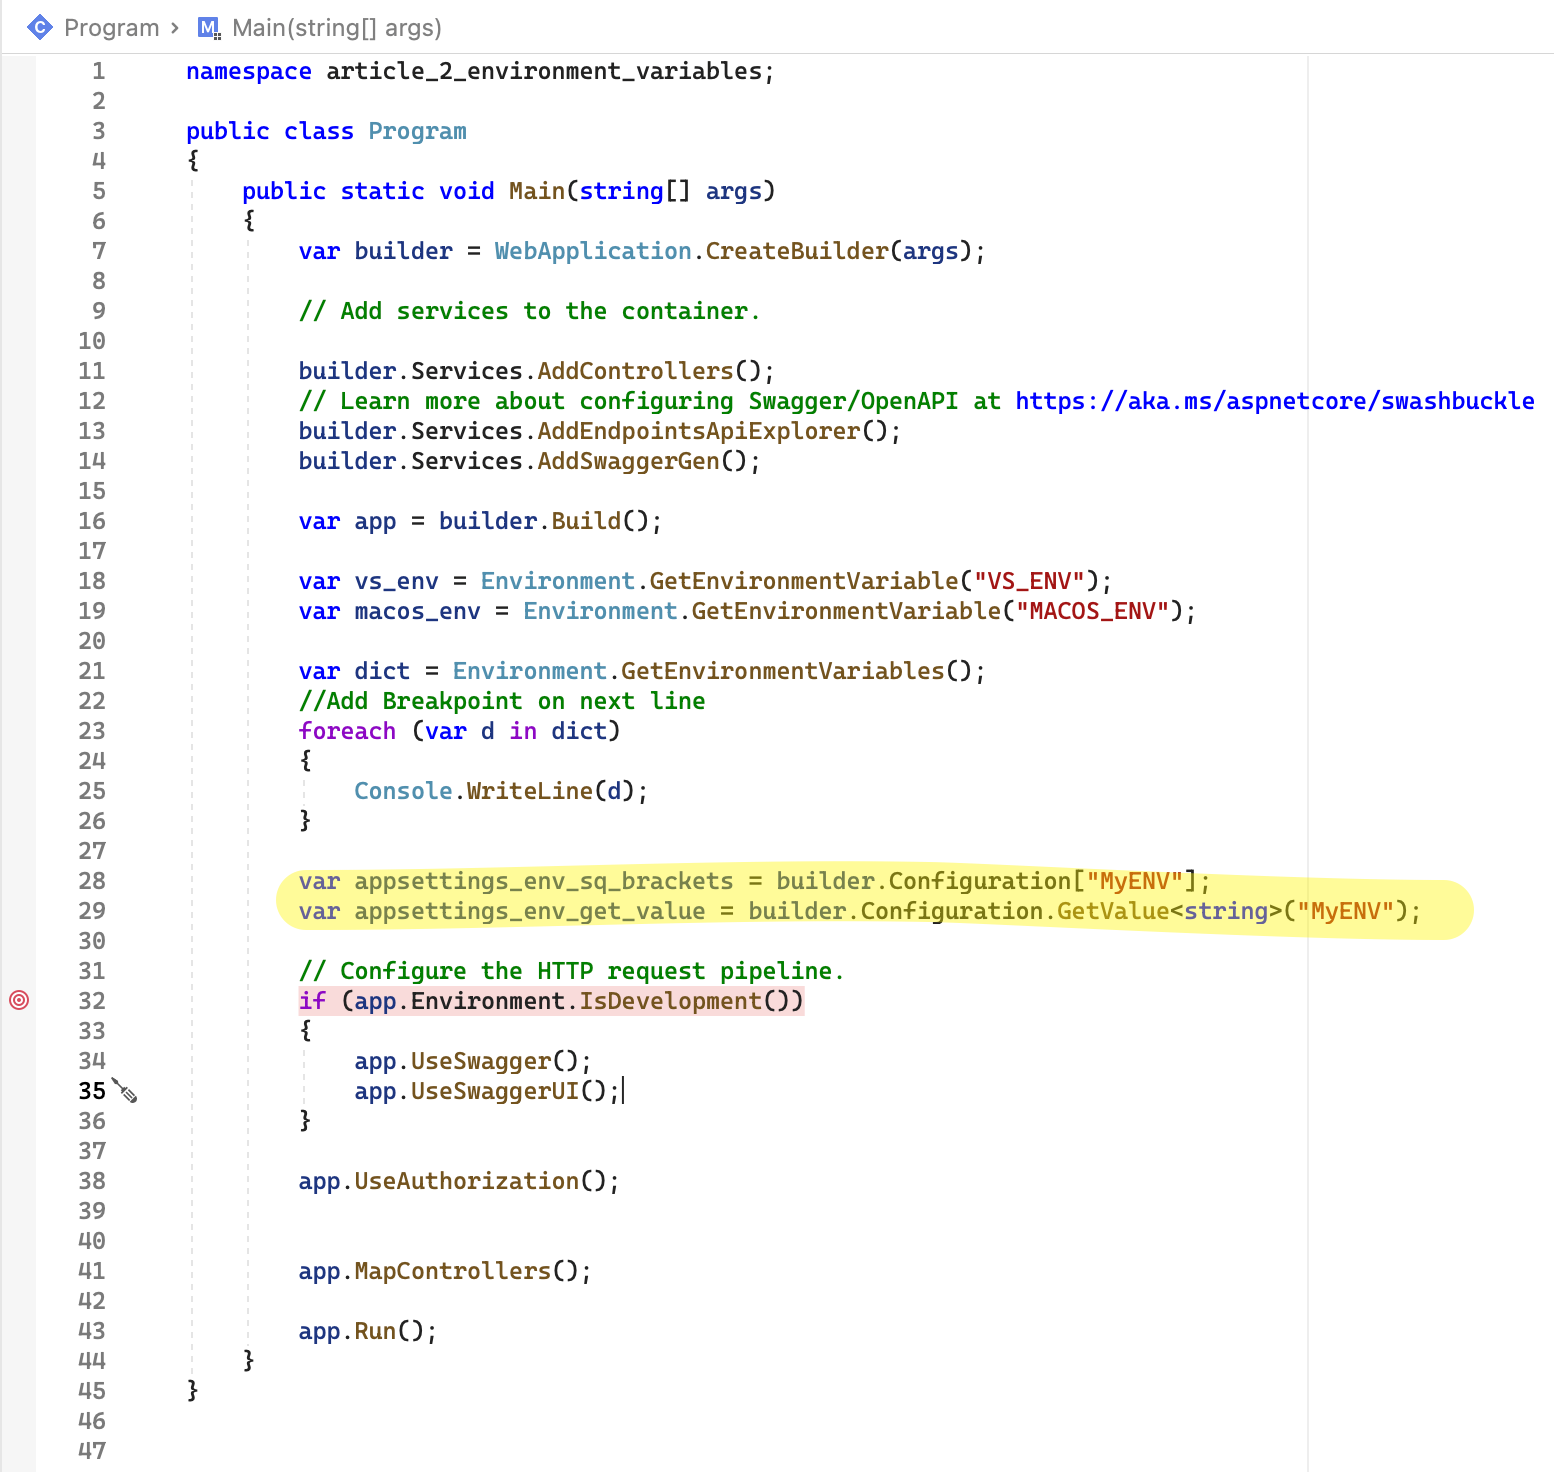
In the Program.cs file we'll add two lines of code to read the configuration value MyENV. Below is what your Program.cs files should look like. Values from the appsettings.json files can be read in multiple ways. The first new line of code is using square bracket notation and the second new line of code is using the GetValue<Type> method to read the same value.
We will run this project two times. One time with the Visual Studio environment variable ASPNETCORE_ENVIRONMENT=Development and another run with the environment variable ASPNETCORE_ENVIRONMENT=Staging. The screenshot below shows the values read from each runtime environment.
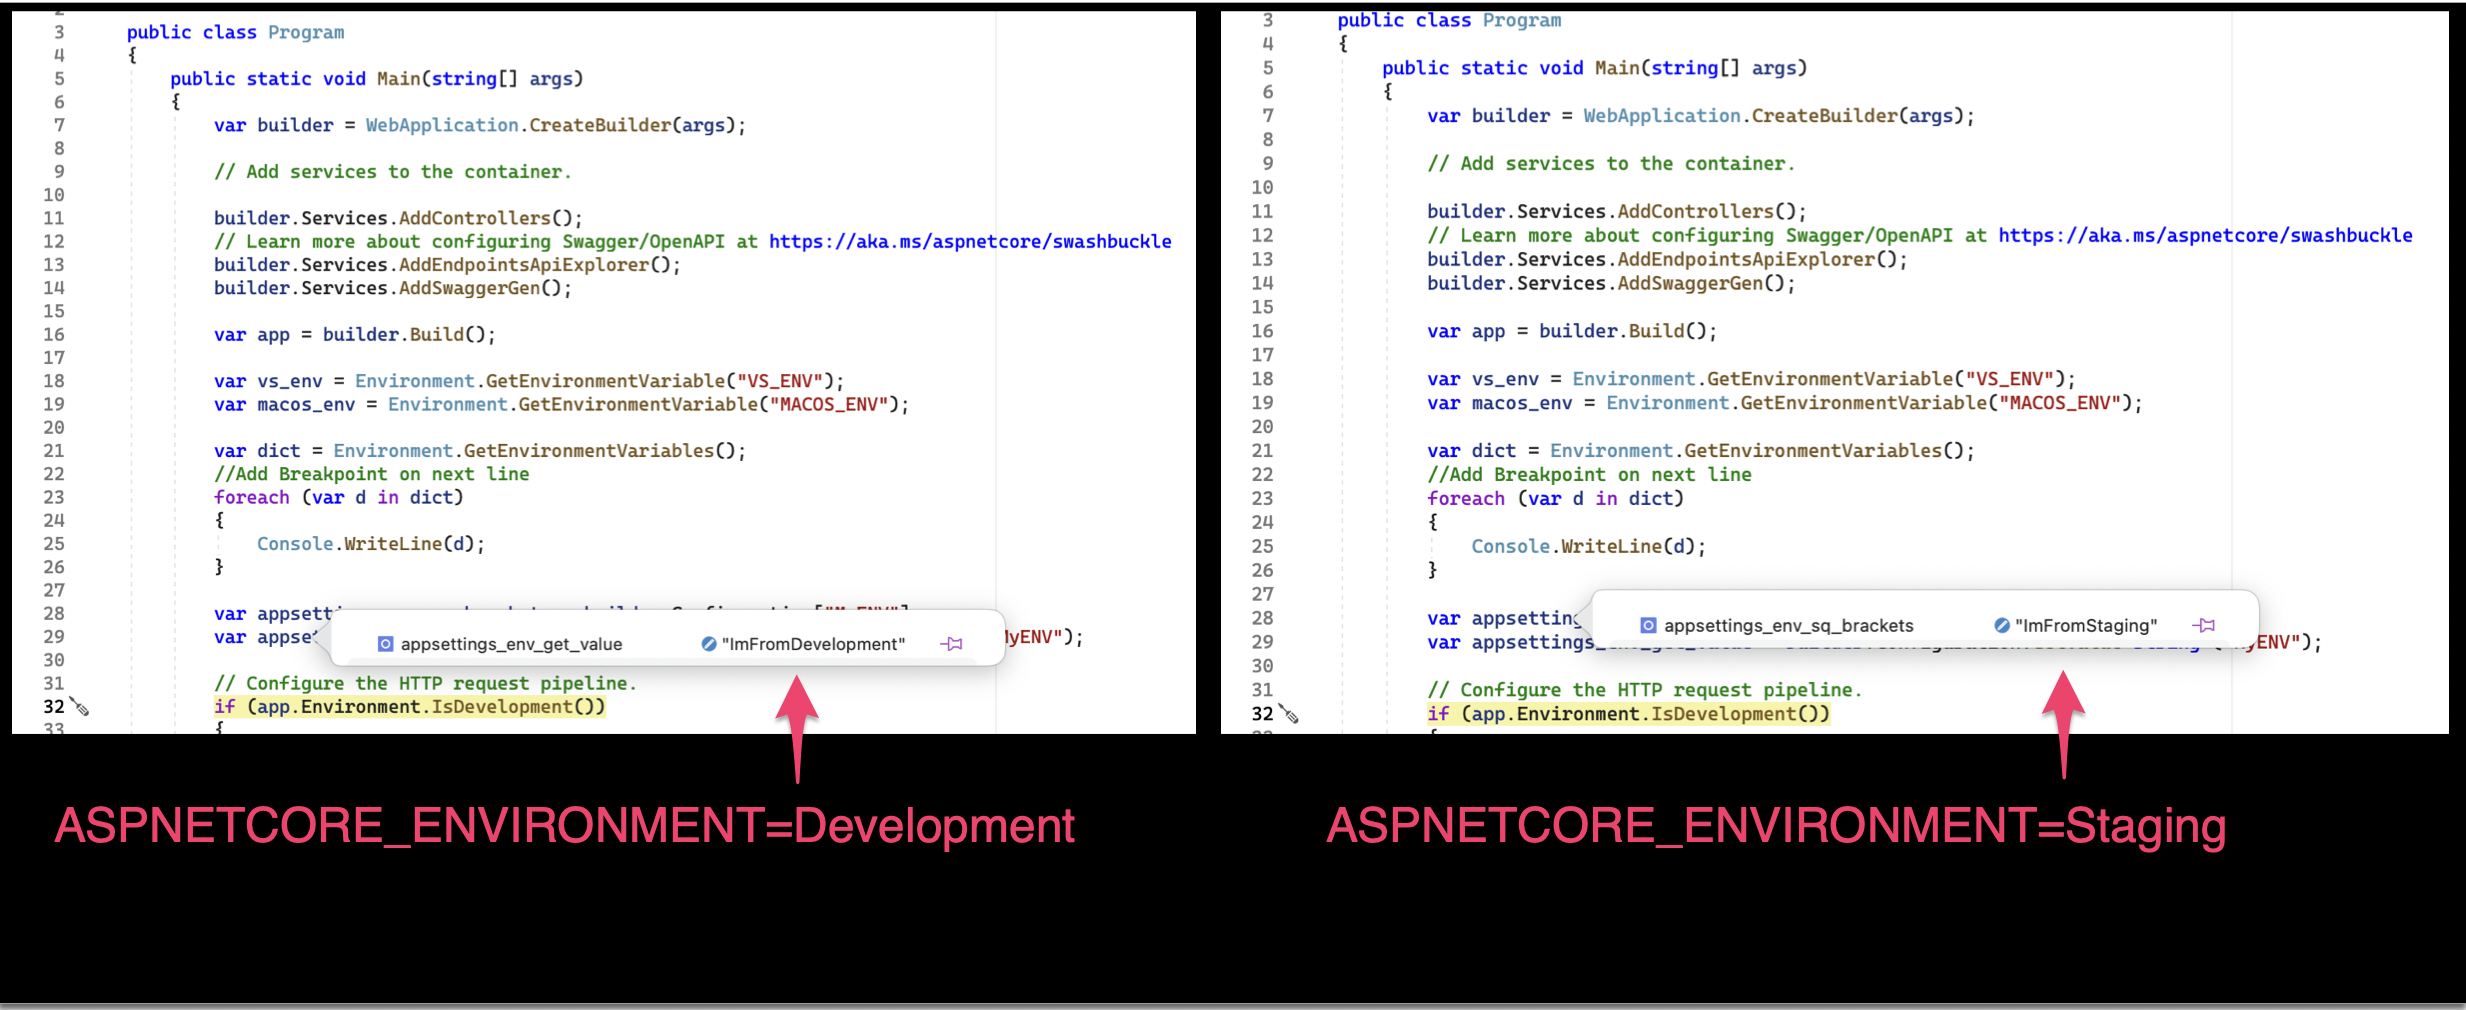
There you have it, Visual Studio will load the correct appsettings.json file based on your ASPNETCORE_ENVIRONMENT variable automatically. This is great for local development and you can write to the app setting files via CI/CD builds and deploy builds with the correct variables based on the runtime environment.
Strongly Typed Settings - Options Pattern
Well now use the Options Pattern to provide the variable/config/setting values from the appsettings.json file into a class structure that can be utilized throughout your application.
// Updated appsettings.json

{
  "Logging": {
    "LogLevel": {
      "Default": "Information",
      "Microsoft.AspNetCore": "Warning"
    }
  },
  "AllowedHosts": "*",
  "SampleClass": {
    "StringValue": "String Sample",
    "BooleanValue": true
  }
}
We'll create the SampleClass.cs as shown below.
// New file, SampleClass.cs

using System;
namespace article_2_environment_variables;

public class SampleClass
{
    public string StringValue { get; set; }
    public bool BooleanValue { get; set; }
}
Next, add a single line in the Program.cs file to bind the values from the JSON file to the class object. That's it.
// Program.cs File

...

builder.Services.Configure<SampleClass>(builder.Configuration.GetSection(nameof(SampleClass)));

...
You can now use Dependency Injection (DI) to use these values in your WeatherForecastController. Setup your class object in the controller's constructor as below. DI is a recommended approach instead of global/ static variables.
// WeatherForecastController.cs

...

private readonly SampleClass _sampleClass;

public WeatherForecastController(ILogger<WeatherForecastController> logger, IOptions<SampleClass> sampleClassOptions)
{
    _logger = logger;
    _sampleClass = sampleClassOptions.Value;
}

 [HttpGet]
 [Route("SampleClass")]
 public SampleClass GetSampleClass()
 {
    return _sampleClass;
 }

...
When running the project (set ASPNETCORE_ENVIRONMENT=Development you can now hit this new /SampleClass endpoint and see the values returned from your API.

End
The official .NET docs are great. Read further details here.