.NET Web API - API Key Authorization

Full Stack Data Dev.
Simple API Lockdown
Introduction
The previous article reviewed how to set and read environment variables. We'll use that knowledge and set up an API Key as an environment variable for authorization in a .NET Web API Project. Keys are a variable you would not want to check into your code repo, so environment variables are a perfect place for them. We don't want to store keys in our appsettings.json file, you can also store them in a 3rd party key vault or whatever you prefer outside of your project.
An API Key can serve two main purposes, a method of identifying the caller, client, or requestor of the API Service and also controlling access to the API Service. It is a simple method of security to protect API resources.
API keys are a common approach to auth when using microservices, having internal services communicate with each other.
API keys can be managed in a couple of different ways. For example, one approach is to create client-specific keys. The key can be used to validate the requesting service in order to provide specific access to one service versus another such as rate limiting, read vs write access, performance priority, etc. You need to manage to create multiple keys and assign them to the correct party. That is outside the scope of this article. Another approach is using a static key that can be provided to all API client services for authorization. "One key to rule them all..." this is the use case we'll walkthrough in this article.
Code for this example can be found here - API Key Project Repo. Continuing along with the other articles in this series I'll be building in Visual Studio for Mac using .NET 6.
Setup an API Key Environment Variable
For this walkthrough, we will store the API Key in Visual Studio for Mac's Environment Variable properties.
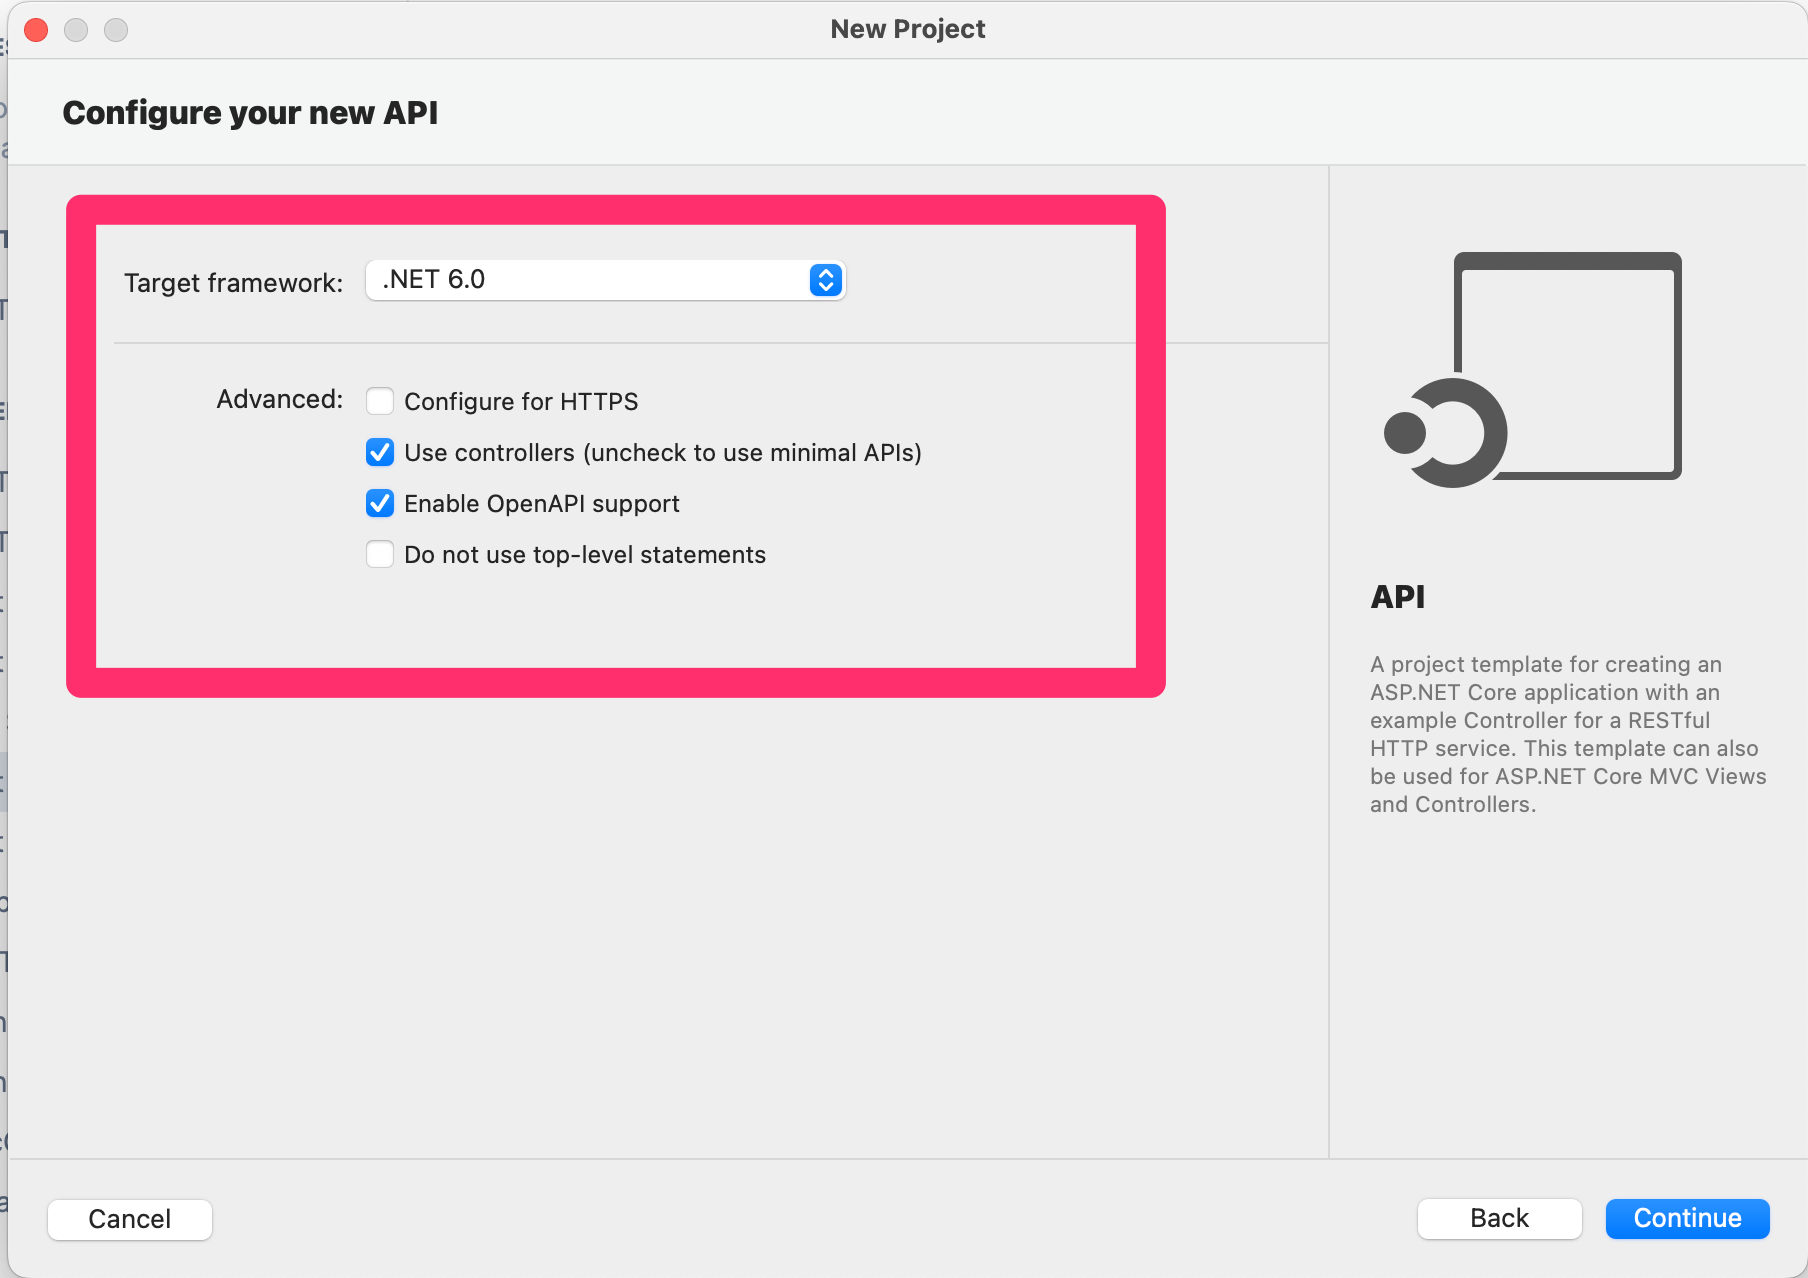
This project will be a new build from scratch, below are the settings I'm using.
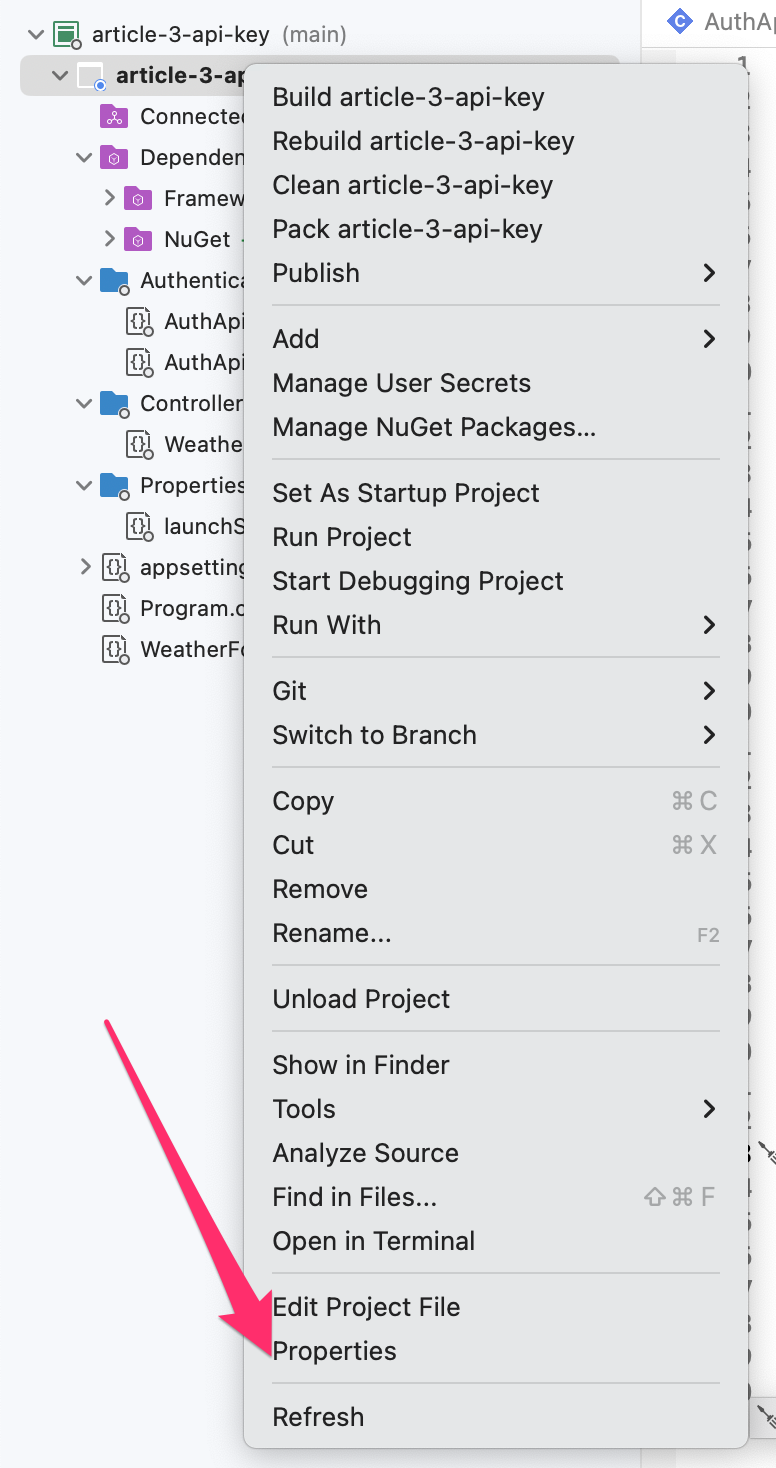
After your new project is scaffolded out, go to the Project's Properties window by either right-clicking the project folder in the solution explorer window or in the menu bar click on Project and select the Properties in the drop-down.
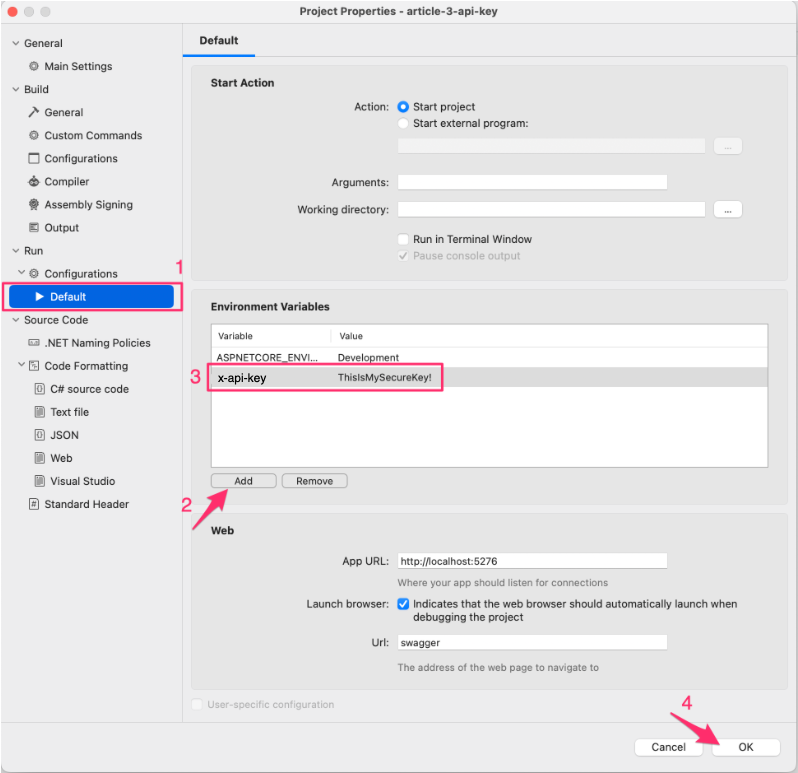
In the Properties window go to the Run > Configurations > Default option and add a new Environment Variable.
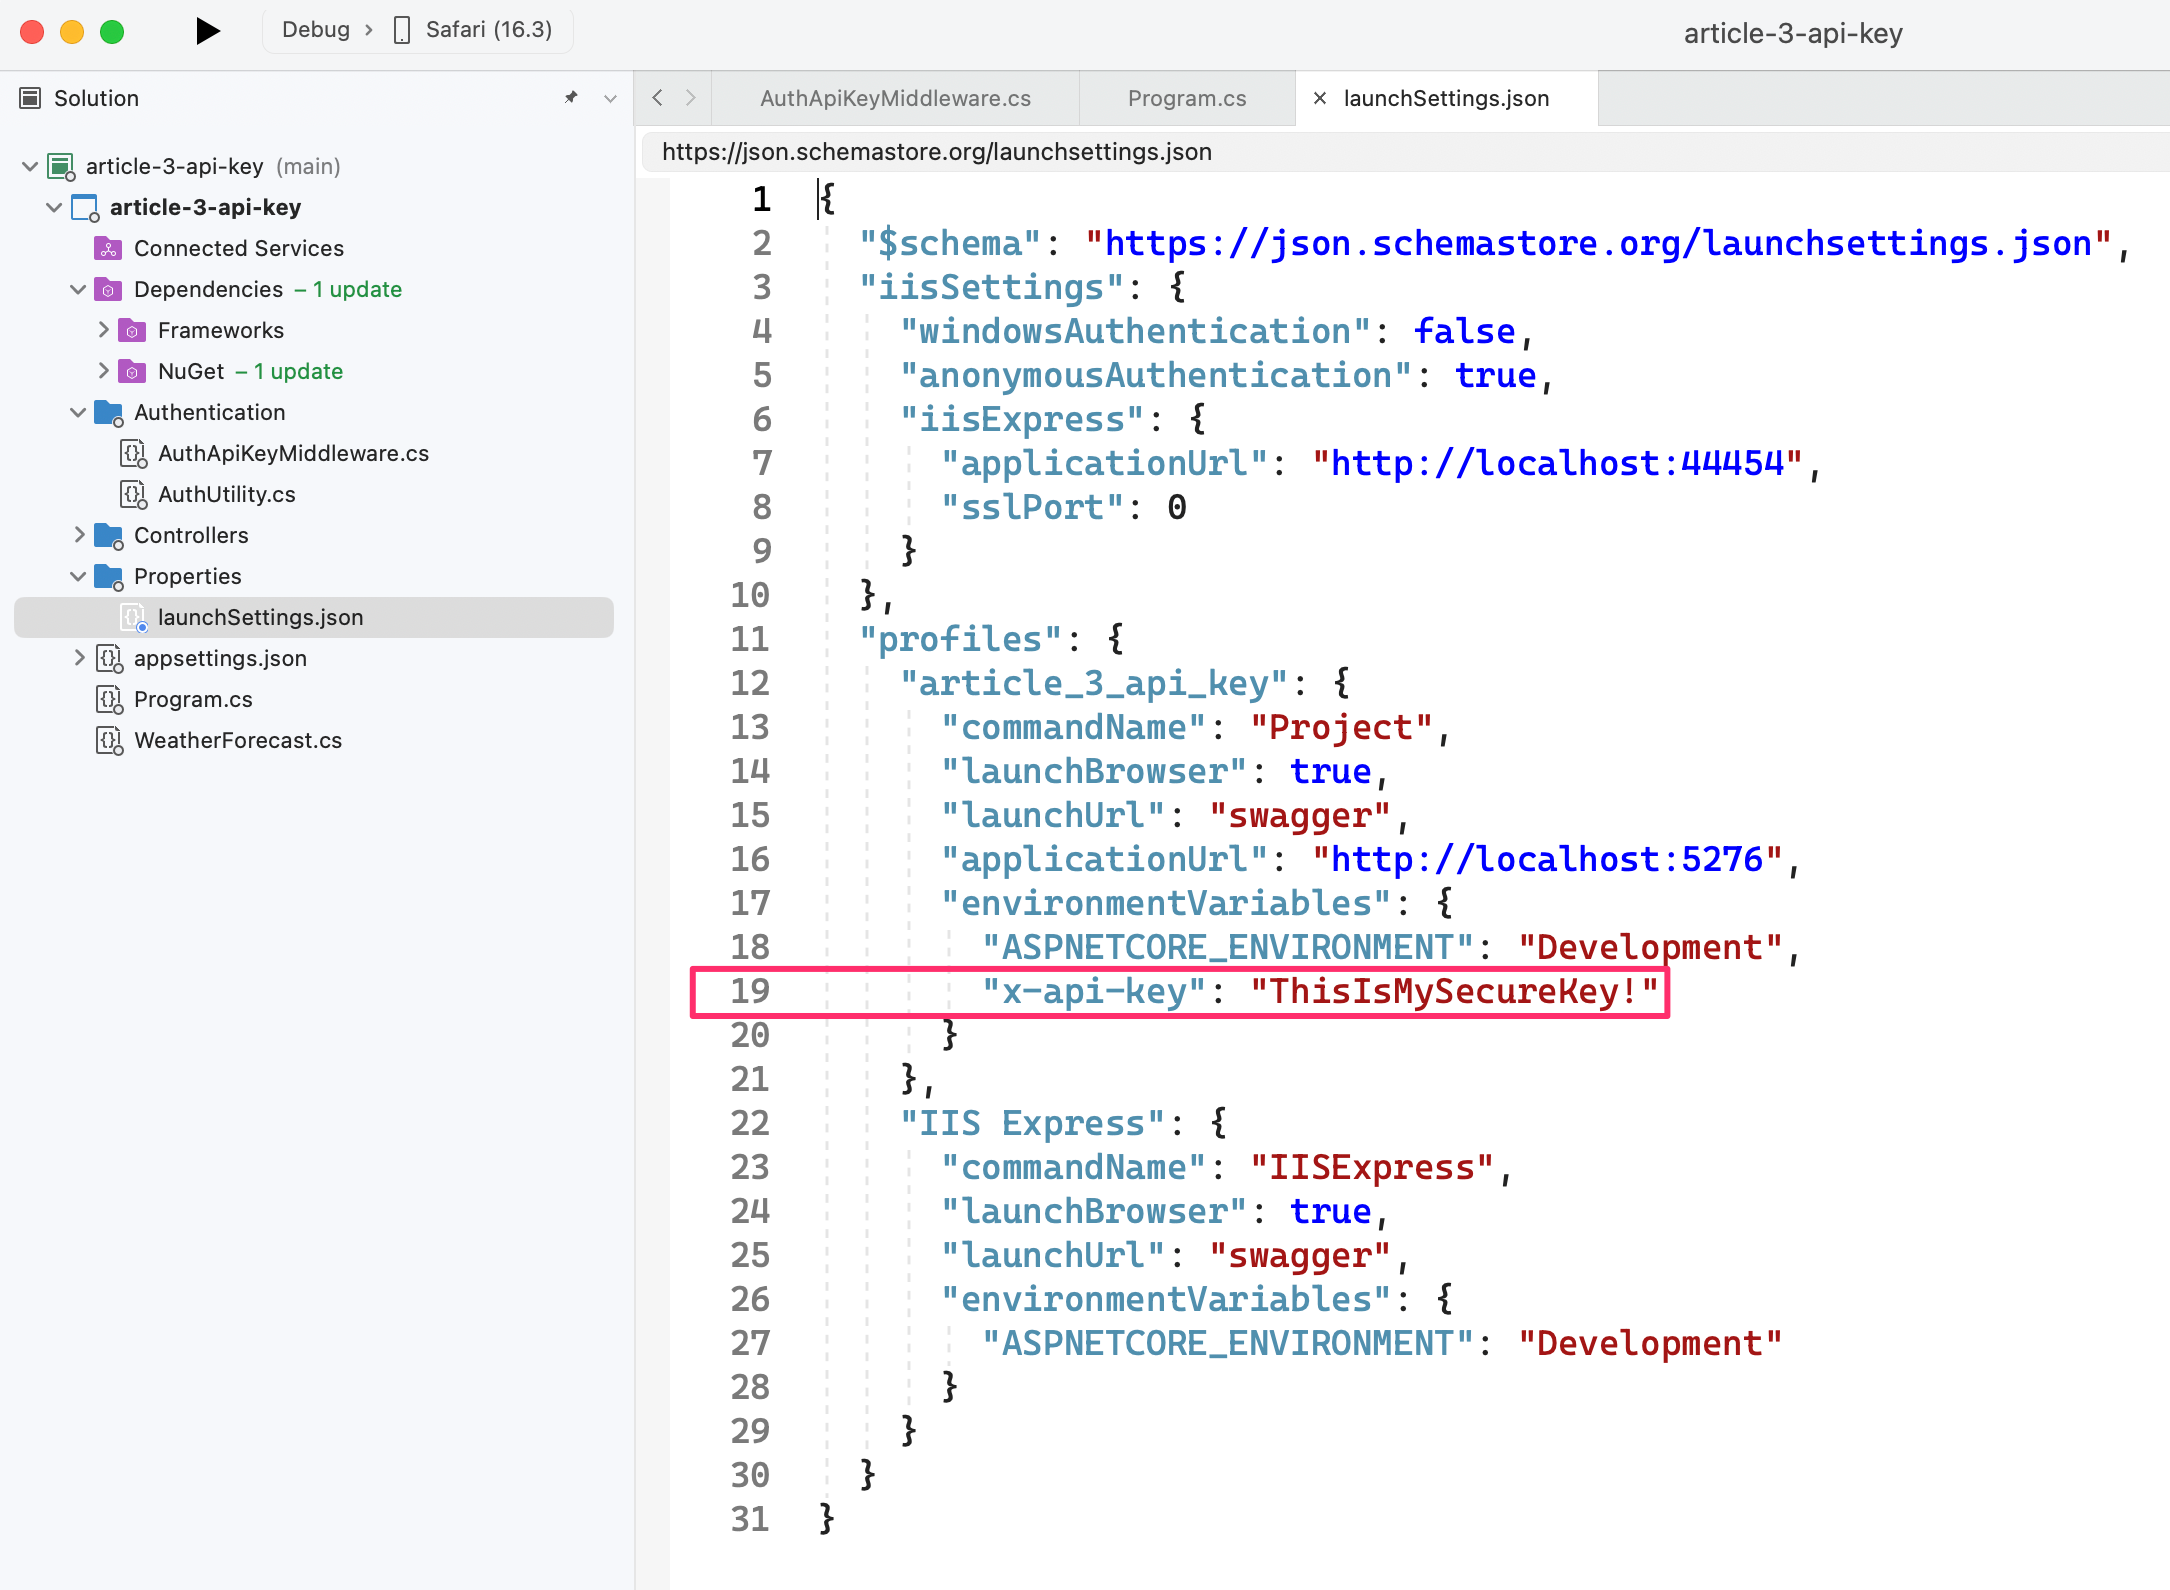
⚠️ Environment variables create in Visual Studio are copied to your
launchSettings.jsonfile in the projects Properties folder. This file is not in your.gitignorefile by default.Your ENV variables should not be in your code, this is just a development example.
Middleware
We need to add a new directory named Authentication for our changes. We will be creating a middleware that will be injected into the application request pipeline.
.NET Middleware is the pipeline that handles requests and responses in the application. Request Delegates are the individual stops along the pipeline. We use Dependency Injection to add the
RequestDeleteparameter to our custom middleware classAuthApiKeyMiddleware. Writing custom middleware documentation is available on the Microsoft Docs site.
The InvokeAsync method will add the HttpContext in order to access all the details of the request such as headers, user context, query strings, etc.
The InvokeAsync method will perform two main tasks:
Check if the request includes the
x-api-keyheader.If the request does include the
x-api-keyheader, make sure it is valid.
In either case, if the x-api-key header is missing or the value is not valid, the middleware will return an UNAUTHORIZED: 401 response before even hitting our API endpoint.
In the event that the x-api-key is valid, then the request context is passed onto the next delegate in the pipeline.
⚠️ This auth middleware will be applied to all endpoints in the project. If you only want to restrict specific endpoints an Auth Attribute will need to be created instead. We'll cover than later.
using System;
namespace article_3_api_key.Authentication
{
    public class AuthApiKeyMiddleware
    {
        // Request Delete that is used to manage each HTTP request.
        private readonly RequestDelegate _next;
        // API Key Header Name
        private const string ApiKeyHeader = "x-api-key";

        // Inject Request Delegate into API Key Middleware
        public AuthApiKeyMiddleware(RequestDelegate next)
        {
            _next = next;
        }

        // Pass the Request's HTTP Context
        public async Task InvokeAsync(HttpContext context)
        {
            // Look for the "x-api-key" Header in the request
            if(!context.Request.Headers.TryGetValue(ApiKeyHeader, out var extractedApiKey))
            {
                // If not found, throw a 401 status
                // 401 = Invalid or Missing Credentials
                // https://developer.mozilla.org/en-US/docs/Web/HTTP/Status/401
                context.Response.StatusCode = 401;
                await context.Response.WriteAsync("UNAUTHORIZED: API Key Missing");
                return;
            }

            // Get the real key from our ENV Variable
            var apiVal = Environment.GetEnvironmentVariable(ApiKeyHeader);

            // API Key found in Header
            // Validate the Key
            if(!apiVal.Equals(extractedApiKey))
            {
                // If key is not valid, throw a 401 status
                // 401 = Invalid or Missing Credentials
                // https://developer.mozilla.org/en-US/docs/Web/HTTP/Status/401
                context.Response.StatusCode = 401;
                await context.Response.WriteAsync("UNAUTHORIZED: Invalid API Key");
            }

            // Valid API Key was provided
            // Pass request to the next delegate in the pipeline
            await _next(context);
        }
    }
}
To use this middleware in the application pipeline, we need to add a single line of code in the Program.cs file. Below is a section of the file showing the use of the new middleware.
// Program.cs FILE
...

// NEW LINE: Add new API KEY Middleware to pipeline
app.UseMiddleware<AuthApiKeyMiddleware>();

app.UseAuthorization();

app.MapControllers();

app.Run();
Start the project to test the changes. Click the play button in the top menu of Visual Studio.
Try it out
I'm going to hit the API using CURL statements... 3 different attempts to see the application's response for the following cases: Missing API Key, Invalid API Key, and Valid API Key.
Missing API Key
curl -X GET http://localhost:5276/WeatherForecast
You should see the following unauthorized response:

Invalid API Key
curl -X GET http://localhost:5276/WeatherForecast -H 'x-api-key: WrongKey'
You should see the following unauthorized response:

Valid API Key
curl -X GET http://localhost:5276/WeatherForecast -H 'x-api-key: ThisIsMySecureKey!'
You should see the weather response below.

Swagger Support
If you try hitting the weather endpoint in Swagger you will receive a 401 response. Swagger is not sending the API key along with the request so each request is rejected. Currently, there is no place to add the API Key to your requests. Let's fix that.
In the Programs.cs file update the builder.Services.AddSwaggerGen extension. The code is shown below.
We are specifying the "Security Definition" for an input to build the header named x-api-key.
We then add a Security Requirement based on a scheme that will use the API key header.
// Program.cs
...

builder.Services.AddSwaggerGen(x =>
{
    x.AddSecurityDefinition("Weather API Key", new OpenApiSecurityScheme
    {
        // Header Name
        Name = "x-api-key",
        Type = SecuritySchemeType.ApiKey,
        Scheme = "ApiKeyScheme",
        In = ParameterLocation.Header,
        Description = "API Key Header Requirement"
    });

    x.AddSecurityRequirement(new OpenApiSecurityRequirement
    {
        {
            new OpenApiSecurityScheme
            {
                Reference = new OpenApiReference
                {
                    Type = ReferenceType.SecurityScheme,
                    Id = "Weather API Key"
                },
                // Scheme using Header
                In = ParameterLocation.Header
            },
            new List<string>()
        }
    });
});

...
Let's start up the project and use Swagger.
You will now see a green Authorize button that was not available before.

Click on Authorize and enter your API Key and click Authorize to save your input and Close to close the prompt.
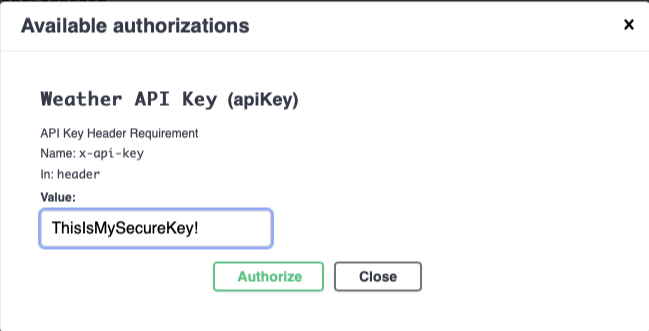
You can now try to execute the endpoint and you will see the weather data returned.
Attributes
For scenarios where the flexibility of securing specific endpoints is required .NET Custom Attributes can be used instead of Middleware. Again, the middleware implemented before was locking down all endpoints for all controllers.
We first need to comment out the line in Program.cs to use the new API Key middleware, we don't want to use that delegate for every API request for this example. We'll use attributes at a Controller (Class) and Endpoint (Method) level of execution to validate the API key.
// Program.cs

...
//app.UseMiddleware<AuthApiKeyMiddleware>();
...
Next, create a new Attribute class, AuthApiKeyAttribute in the Authentication folder.
using System;
using Microsoft.AspNetCore.Mvc.Filters;

namespace article_3_api_key.Authentication
{
    [AttributeUsage(AttributeTargets.Class | AttributeTargets.Method)]
    public class AuthApiKeyAttribute : Attribute, IAsyncActionFilter
    {
        // API Key Header and ENV Name
        private const string ApiKeyHeader = "x-api-key";

        public async Task OnActionExecutionAsync(ActionExecutingContext context, ActionExecutionDelegate next)
        {
            // Look for the "x-api-key" Header in the request
            if (!context.HttpContext.Request.Headers.TryGetValue(ApiKeyHeader, out var apiKeyVal))
            {
                // If not found, throw a 401 status
                // 401 = Invalid or Missing Credentials
                // https://developer.mozilla.org/en-US/docs/Web/HTTP/Status/401
                context.HttpContext.Response.StatusCode = 401;
                await context.HttpContext.Response.WriteAsync("UNAUTHORIZED: API Key Missing");
            }

            // Get the real key from our ENV Variable
            var apiVal = Environment.GetEnvironmentVariable(ApiKeyHeader);
            if (!apiVal.Equals(apiKeyVal))
            {
                // If not found, throw a 401 status
                // 401 = Invalid or Missing Credentials
                // https://developer.mozilla.org/en-US/docs/Web/HTTP/Status/401
                context.HttpContext.Response.StatusCode = 401;
                await context.HttpContext.Response.WriteAsync("UNAUTHORIZED: Invalid API Key");
            }

            await next();
        }
    }
}
The new class will specify a base class of Attribute and IAsyncActionFilter. The AttributeUsage decorator is also an Attribute that indicates that this Attribute class will be used on classes (Controllers) and methods (endpoints/ actions).
Outside of the class decorations, the OnActionExecutionAsync method is identical to the middleware example. We are looking to ensure the API key header is included and if it is, make sure it is valid.
To test that the Attribute only works on specific controller endpoints and not all of them, we are going to create a new endpoint.
In the WeatherForecastController, change the attributes on the existing endpoint to use the AuthAPIKey attribute. A using statement will be required to point to the new class file. Another change is that "Secure" is added to the route.
The second endpoint is a copy of the first endpoint. All but the AuthAPIKey Attribute is not specified. The route of this endpoint is "Open".
// WeatherForecastController.cs
using article_3_api_key.Authentication;
...

[AuthApiKey]
[HttpGet]
[Route("Secure")]
public IEnumerable<WeatherForecast> Get()

...

[HttpGet]
[Route("Open")]
public IEnumerable<WeatherForecast> GetTest()

...
Start up the project and let's explore the changes in Swagger.
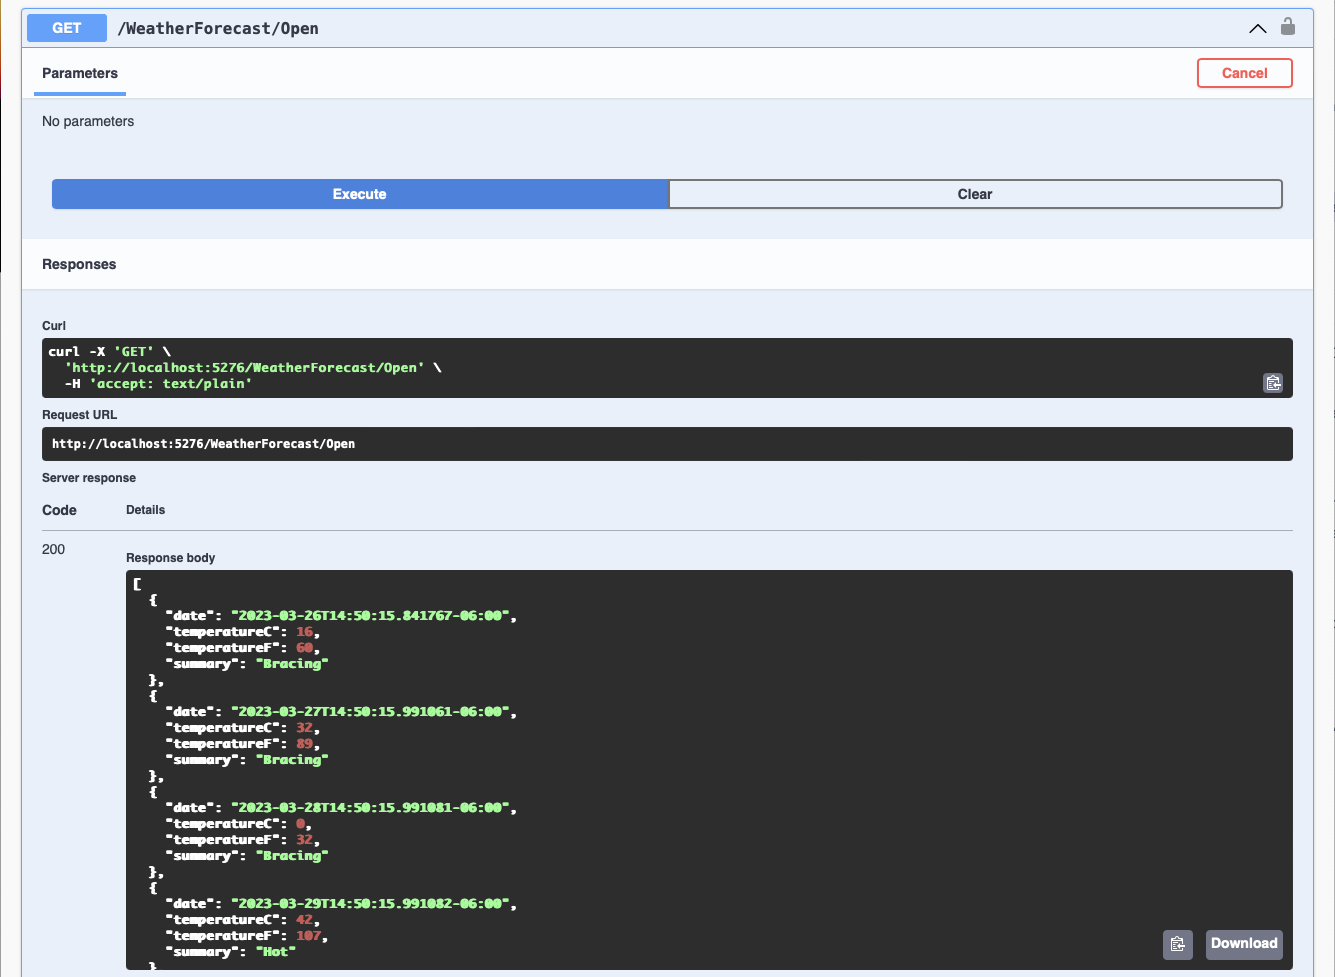
Open Endpoint
Without entering your API Key, execute the /WeatherForecast/Open endpoint and you will be able to see the weather data returned with no restrictions.
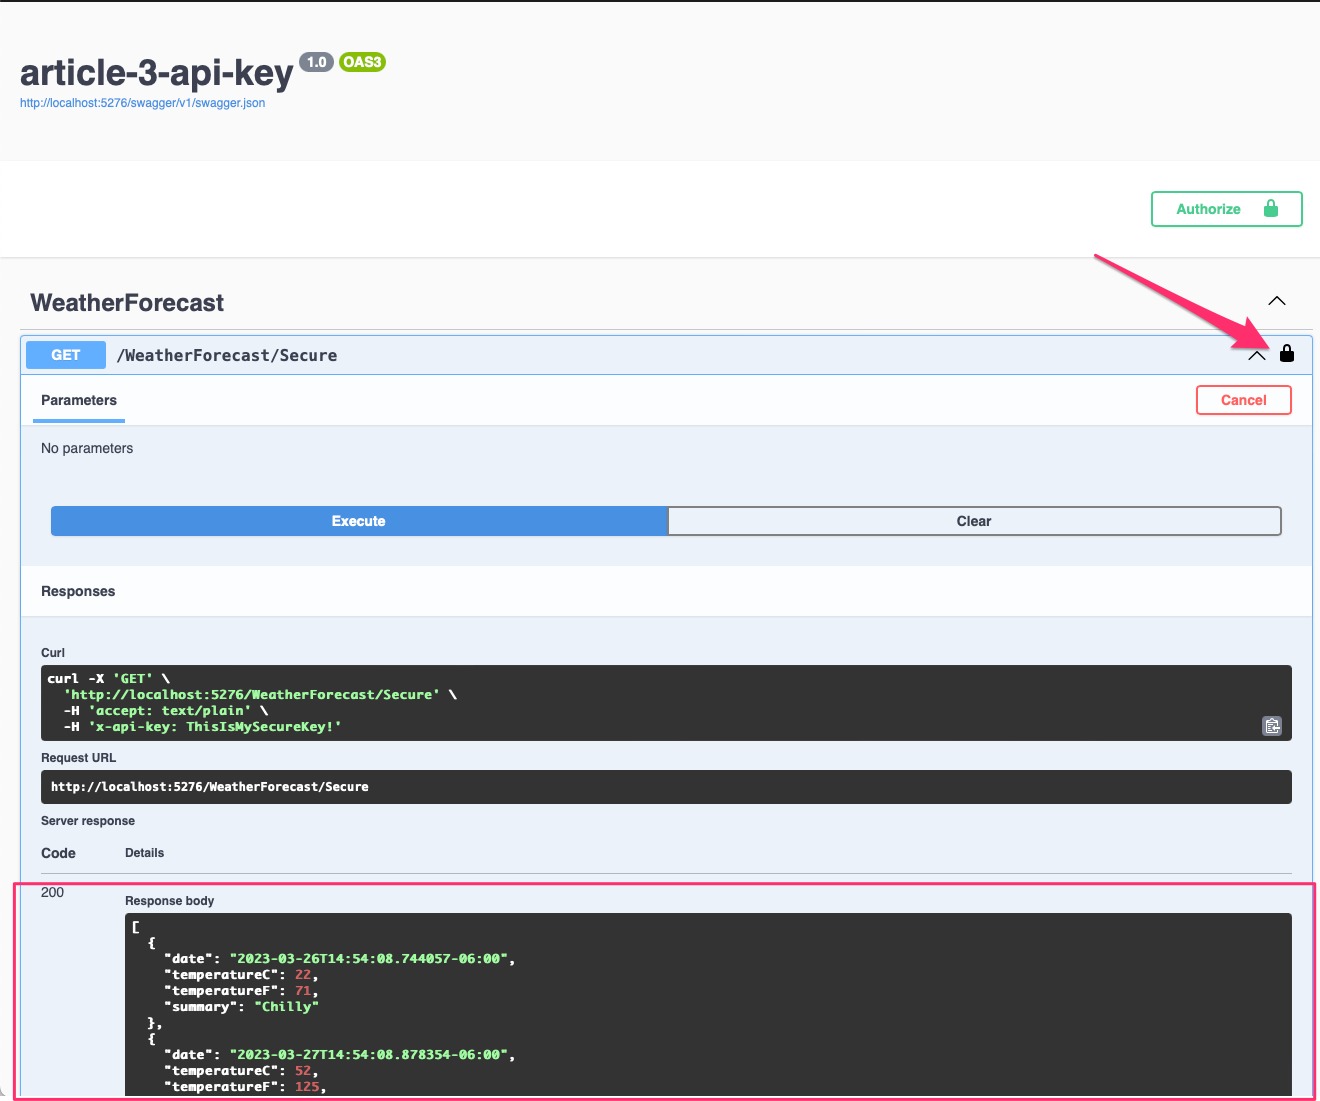
Secure Endpoint via Attribute
Executing the Secure endpoint will result in a 401 Unauthorized Response without the API key. The Controller will require the Auth API Key Attribute to be run before hitting the endpoint.
Enter your API key and try again, you will see the lock icon activated in Swagger and the data is now returned from a secure route.
End
You now have a working API Key Middleware and Attribute option for a .NET 6 Web API Project.